Develop and share the world's knowledge!
We want to connect the people who have knowledge to the people who need it, to bring together people with different perspectives so they can understand each other better, and to empower everyone to share their knowledge.
I keep getting tasks that are above my skill level. How can I address this without coming accross as grossly incompetent?
First, this answer hinges on the fact that you do mention to those who are assigning you tasks that you will have difficulty with them, and that this is accepted. Particularly in a junior role, even if only with a specific technology stack, that really should be accepted; nobody can expect someone wRead more
First, this answer hinges on the fact that you do mention to those who are assigning you tasks that you will have difficulty with them, and that this is accepted. Particularly in a junior role, even if only with a specific technology stack, that really should be accepted; nobody can expect someone who has only worked with a technology stack and a mass of source code for half a year to be as productive as someone who has been doing the same for years.
See lessDealing with an employee that went over my head
Company work hours by default don’t mean everyone has to work them. They only mean company business hours, when someone can come in. Small companies usually have the most flexibility in this regard, so it’s natural for people to assume that flexible hours is a norm for non-customer facing roles. IsRead more
Company work hours by default don’t mean everyone has to work them. They only mean company business hours, when someone can come in. Small companies usually have the most flexibility in this regard, so it’s natural for people to assume that flexible hours is a norm for non-customer facing roles. Is this a helpdesk or sales position? Is it a software developer / network admin / another technical role? Two different treatment plans.
Regarding how to deal with this or similar situation (when employee requests a non-standard accommodation), you need to try your best to accommodate them. Talk to your boss, see what you can do. If you can allow some flex in work start/end time, do so. If after all this you are absolutely sure hours are strict, you must provide a reasonable explanation why this would be the case (unless it’s obvious to everyone, like a bank teller – need to cover a specific shift). In 2017 you cannot just reject them “because I said so”.
See lessHow to approach applying for a job at a company owned by a friend?
Of course it will. But that’s not in and of itself a problem.1 You know this person well enough to consider him a friend so it would be very strange not to give him a heads-up, especially because he’s actually the owner and it’s a small business. Just tell him that you saw the ad and think that youRead more
Of course it will. But that’s not in and of itself a problem.1 You know this person well enough to consider him a friend so it would be very strange not to give him a heads-up, especially because he’s actually the owner and it’s a small business. Just tell him that you saw the ad and think that you could potentially be a good candidate, even if you aren’t a perfect match experience-wise. Just be direct, honest and make it easy for him to say no. There are legitimate reasons not to hire friends, even if there are a few levels between you, your friend might simply prefer not to mix business with personal relationships, or they may as you suspect prefer a more experienced profile.
See lessSQL Cookbook – Recipe 1.1 Retrieving All Rows and Columns from a Table
Solution Use the special “*” character and issue a SELECT against the table:1 select *2 from emp Discussion The character “*” has special meaning in SQL. Using it will returnevery column for the table specified. Since there is no WHERE clausespecified, every row will be returned as well. The alternaRead more
Use the special “*” character and issue a SELECT against the table:
1 select *
2 from emp
The character “*” has special meaning in SQL. Using it will return
See lessevery column for the table specified. Since there is no WHERE clause
specified, every row will be returned as well. The alternative would be
to list each column individually:
select
empno,ename,job,sal,mgr,hiredate,comm,deptno
from emp
In ad hoc queries that you execute interactively, it’s easier to use
SELECT *. However, when writing program code it’s better to specify
each column individually. The performance will be the same, but by
being explicit you will always know what columns you are returning
from the query. Likewise, such queries are easier to understand by
people other than yourself (who may or may not know all the
columns in the tables in the query).
Visual Basic Cookbook – Recipe 1.1 Creating a Windows Forms Application
Solution Sample code folder: Chapter 01\Forms Version Create a WindowsForms application, and add the appropriate controls and logic. Discussion Start Visual Studio 2005, and then create a new project. The StartPage includes a link to do this, or you can use the File New Projectmenu command. The NewRead more
Sample code folder: Chapter 01\Forms Version Create a Windows
Forms application, and add the appropriate controls and logic.
Start Visual Studio 2005, and then create a new project. The Start
Page includes a link to do this, or you can use the File New Project
menu command. The New Project dialog appears, as shown in Figure
1-1.
Figure 1-1. Visual Studio’s New Project dialog
Each template listed in this dialog starts with the most basic and
empty Visual Basic project and adds just enough source code and
configuration settings to get you started on the selected application
type. You could choose the Blank Solution template and work your
way up to the functionality provided through the Windows Application
template, but that’s more than we need to accomplish right now.
Select Visual Basic (or the Windows entry under Visual Basic) in the
“Project types” field and Windows Application in the Templates field,
enter the name of your project in the Name field (let’s call ours
“FormConvertTemp”), and click the OK button.
As Visual Studio works behind the scenes to configure the initial
project features, let’s take a few minutes to review some high school
science. The three temperature systems in this programFahrenheit,
Celsius, and kelvinare often used to measure heat in the various
scientific disciplines:
In the Celsius (or Centigrade) scale, water freezes at 0°C and
reaches its boiling point at 100°C. This makes it a pretty simple
measurement system, at least where water is concerned. Celsius
is used as the common temperature measurement system in
most countries.
The Fahrenheit system uses the environment of its founder,
Gabriel Fahrenheit, as its basis for measurement. 0°F, at the
lower end of the 0-to-100 scale, is rumored to be the coldest
temperature that Fahrenheit measured near his home one winter.
The 100°F mark is based on his own body temperature. This
system, used in America and a few other locations, is especially
convenient if you are a German scientist with a slight fever.
The kelvin system uses the same scale size as the Celsius
system, but places 0K at absolute zero, the theoretical
temperature at which all super-quantum molecular activity
ceases. 0K is equivalent to-273.15°C, and all other temperatures
on the kelvin scale are converted to Celsius through a simple
adjustment of that same 273.15°value. Kelvin is one of the seven
base SI (Système International d’Unités) units of measure and is
used in scientific work.
The ability to convert between the different systems is important, not
only for international relations, but also for health considerations
(“Mom, I’m too sick to go to school today; I have a temperature of
310.15K!”).
By now, Visual Studio should have completed its work and presented
you with the initial project form (Figure 1-2).
Figure 1-2. Your project’s initial form
The form you see represents the initial main form of your application.
It is part of a project, a collection of files usually tied to a single target,
such as an application, a dynamic-link library, or some other output. In
Windows Forms projects, the target is an executable file (with an EXE
file extension) that contains a compiled .NET application. All of the
files in your project are listed in the Solution Explorer, one of the
standard tool windows in Visual Studio (Figure 1-3).
The top edge of the Solution Explorer includes a set of toolbar buttons
that help you “explore the solution.” The most interesting of these buttons is the second from left, the Show All Files button. Clicking this
button toggles the view of files included in your project. Most of the
files included in your application are hidden from view by default.
Visual Studio does an amazing amount of work behind the scenes,
and most of this work is stored in hidden project files. Most of these
files contain code automatically generated by Visual Studio as you
design your program. A few of these files, such as
ApplicationEvents.vb, do contain code that you can update manually,
but most of your development time will focus on the files that are
always displayed.
Figure 1-3. The Visual Studio Solution Explorer
The main area of the form is its design surface, on which you place (or
“draw”) controls. The Toolbox (Figure 1-4) contains the controls that
you can add to your form; it’s just one of the many “tool windows”
available within Visual Studio. If it’s not already displayed, open the
Toolbox now through the View Toolbox menu command.
Figure 1-4. Partial view of the Visual Studio Toolbox
The selection of controls included in the Toolbox varies based on the
active project and window. Beyond the default controls, several third
parties offer enhanced controls for use in your projects. Once
installed, these controls also appear in the Toolbox.
Each form or control has a default configuration, as determined by the
developer of the control. You can alter this configuration by changing
the active form’s or control’s properties through the Properties window
(Figure 1-5). If it is not already in view, display the Properties window
with the View Properties Window menu command.
Figure 1-5. Partial view of the Properties window
The properties for the active item are pretty easy to adjust: select the
form or control you want to modify, select a property in the Properties
window based on the property name in the left column, and use the
mouse or keyboard to modify its value in the right column. Some
properties can be expanded into distinct sub-properties using the plus
sign (+) to the left of the property name. And while most properties
accept simple text values, others have mouse-friendly drop-down
editors.
Before adding controls to our form, let’s configure the properties of the
form itself. Using the Properties window, set the form’s properties as
shown in Table 1-1. This table lists only those properties that deviate
from their default settings.
Table 1-1. Application form property changes
Now let’s add the controls to the form. This project will use seven
controls:
Three RadioButton controls to select the source temperature
system
Three TextBox controls for entering and displaying temperatures
One Button control to initiate the conversion
Use the Toolbox to select and add controls to the form. Add a control
either by double-clicking on the control in the Toolbox or by selecting
the control in the Toolbox and then “drawing” it on the surface of the
form using the mouse. Go ahead and add the three RadioButton
controls, three TextBox controls, and one Button control, and arrange
them so that your form resembles Figure 1-6. You may also want to
resize the form to visually fit the contained controls.
Figure 1-6. Project form with included controls
Some of the properties in these controls also need to be adjusted. Use
the values in Table 1-2 to guide you through the property updates.
Table 1-2. Custom property settings for each control
The “&” character added to some of the properties sets the keyboard
shortcut for that control so that the user can activate it with the Alt+key
keyboard sequence.
There are two more tasks to perform on the form itself before we start
writing code, both destined to make the form easier to use. The first is
to allow the Enter or Return key to act like a click on the
ConvertTemperature button. This is done by setting one of the form’s
properties: AcceptButton. Setting this property to the name of a valid
controlin this case, the ConvertTemperature button controlenables this
keyboard action. Go ahead and set the form’s AcceptButton property
now.
The second user-friendly update involves setting the ” tab order” of the
controls on the form. The Tab key allows the user to move from one
form control to another, but the movement may look somewhat
random to the user unless you specifically declare the order. To set the
tab order, first make sure that the formand not one of its contained
controlsis the active object in the designer window. Then select the
View Tab Order menu command. A small number appears next to
each control. To readjust the tab order, click the controls in the order
you want them to appear (Figure 1-7). You can also set the tab order by altering the TabIndex property of each control, but the mouse
method is generally quicker.
Figure 1-7. Project form with tab order set for each control
When you are finished, select the View Tab Order menu command
once more (or press the Escape key) to return to standard editing.
Now it’s time to program! All of the code for this application will appear
in the ConvertTemperature button’s Click event procedure, which you
can access by double-clicking on the ConvertTemperature button itself.
Visual Studio switches to a code editor with the following event
procedure template ready to use: Public Class ConvertForm Private
Sub ConvertTemperature_Click( _ ByVal sender As System.Object, _
ByVal e As System.EventArgs) _ Handles ConvertTemperature.Click
End Sub End Class
Add the following code to the Click event procedure body. It
determines the source temperature type, checks for valid input, and
then performs the conversion:
‘ —– Convert between Fahrenheit, Celsius, and
kelvin.
On Error Resume Next
If (SourceFahrenheit.Checked = True) Then
‘ —– Convert from Fahrenheit to other
types.
If (IsNumeric(ValueFahrenheit.Text) =
True) Then
‘ —– F->C, F->K.
ValueCelsius.Text = _
(Val(ValueFahrenheit.Text) – 32) /
1.8
ValueKelvin.Text = _
((Val(ValueFahrenheit.Text) – 32) /
1.8) + 273.15
Else
‘ —– Invalid data.
ValueCelsius.Text = “Error”
ValueKelvin.Text = “Error”
End If
ElseIf (SourceCelsius.Checked = True) Then
‘ —– Convert from Celsius to other
types.
If (IsNumeric(ValueCelsius.Text) = True)
Then
‘ —– C->F, C->K.
ValueFahrenheit.Text = _
(Val(ValueCelsius.Text) * 1.8) + 32
ValueKelvin.Text =
Val(ValueCelsius.Text) + 273.15
Else
‘ —– Invalid data.
ValueFahrenheit.Text = “Error”
ValueKelvin.Text = “Error”
End If
Else
‘ —– Convert from kelvin to other
types.
If (IsNumeric(ValueKelvin.Text) = True)
Then
‘ —– K->F, K->C.
ValueFahrenheit.Text = _
((Val(ValueKelvin.Text) – 273.15) *
1.8) + 32
ValueCelsius.Text =
Val(ValueKelvin.Text) – 273.15
Else
‘ —– Invalid data.
ValueFahrenheit.Text = “Error”
ValueCelsius.Text = “Error”
End If
End If
The program is now ready to use in all weather conditions.
Although this program is pure .NET through and through, the only
.NET code we witnessed was through the event handler. The call to
the ConvertTemperature_ Click event happens indirectly in the code;
there is no line of source code, at least in your code, that makes a
direct call to the event handler.
When the user clicks on the ConvertTemperature button, the low-level
device driver for the mouse inserts mouse-down and mouse-up events
into the global Windows input-processing queue. The device driver
doesn’t know anything about the various windows displayed on-screen or about .NET; it reports only that a mouse event occurred at a specific
X and Y position on the screen. The Windows operating system uses
this location to determine which window or control was clicked. Once
that’s determined, it sends relevant messages to the message queue
of the application that owns the clicked window. The application
notifies the clicked control that the user has, in fact, clicked that
control. Finally, the code within the .NET control issues a RaiseEvent
statement, which triggers a call to the ConvertTemperature_Click event
handler.
That’s a lot of steps between your finger and the event handler.
Fortunately, you don’t have to handle all of those steps yourself. The
relevant logic already exists in Windows and in .NET; you just have to
write the event handler and connect it to the specific event through the
handler’s Handles keyword (which Visual Basic 2005generates for
you): Private Sub ConvertTemperature_Click( _ ByVal sender As
System.Object, _ ByVal e As System.EventArgs) _ Handles
ConvertTemperature.Click
The rest of the code in the application is composed of standard logic
and calculations that you might find in code from any programming
language: If conditional statements, assignment statements, and
expression processing with operators such as the multiplication
operator (*).
The other recipes in this chapter demonstrate how to implement the
See lesssame program, using different types of interfaces.
C# Cookbook – Recipe 1.1 Determining Approximate Equality Between a Fraction and Floating-Point Value
Solution Verify that the difference between the two values is within anacceptable tolerance:using System;public static bool IsApproximatelyEqualTo(doublenumerator,doubledenominator,double dblValue,double epsilon){double difference = (numerator/denominator) -dblValue;if (Math.Abs(difference) < epsRead more
Verify that the difference between the two values is within an
acceptable tolerance:
using System;
public static bool IsApproximatelyEqualTo(double
numerator,
double
denominator,
double dblValue,
double epsilon)
{
double difference = (numerator/denominator) –
dblValue;
if (Math.Abs(difference) < epsilon)
{
// This is a good approximation
return (true);
}
else
{
// This is NOT a good approximation
return (false);
}
}
Replacing the type double with float allows you to determine
whether a fraction and a float value are approximately equal.
Fractions can be expressed as a numerator over a denominator;
however, storing them as a floating-point value might be necessary.
Storing fractions as floating-point values introduces rounding errors
that make it difficult to perform comparisons. Expressing the value as
a fraction (e.g., 1/6) allows the maximum precision. Expressing the
value as a floating-point value (e.g., 0.16667) can limit the precision
of the value. In this case, the precision depends on the number of
digits that the developer decides to use to the right of the decimal
point.
You might need a way to determine whether two values are
approximately equal to each other. This comparison is achieved by
defining a value (epsilon) that is the smallest positive value, greater
than zero, in which the absolute value of the difference between two
values (numerator/denominator – dblValue) must be less than. In
other words, by taking the absolute value of the difference between
the fraction and the floating-point value and comparing it to a
predetermined value passed to the epsilon argument, we can
determine whether the floating-point value is a good approximation
of the fraction.
Consider a comparison between the fraction 1/7 and its floating-point
value, 0.14285714285714285. The following call to the
IsApproximatelyEqualTo method indicates that there are not
enough digits to the right of the decimal point in the floating-point
value to be a good approximation of the fraction (there are 6 digits,
although 7 are required):
bool Approximate = Class1.IsApproximatelyEqualTo(1, 7,
.142857, .0000001);
// Approximate == false
Adding another digit of precision to the third parameter of this
method now indicates that this more precise number is what we
require for a good approximation of the fraction 1/7:
bool Approximate = Class1.IsApproximatelyEqualTo(1, 7,
.1428571, .0000001);
// Approximate == true
See the “Double.Epsilon Field” and “Single.Epsilon Field” topics in the
See lessMSDN documentation.
ASP.NET Cookbook – Recipe 1.1 Selecting the Right Tabular Control
Solution Use a Repeater, DataList, or DataGrid control. Always choose thesmallest and fastest control that meets your needs, which invariablywill be influenced by other criteria. For example:If you need a quick and easy solutionUse a DataGrid.If you need a lightweight read-only tabular displayUse aRead more
Use a Repeater, DataList, or DataGrid control. Always choose the
smallest and fastest control that meets your needs, which invariably
will be influenced by other criteria. For example:
If you need a quick and easy solution
Use a DataGrid.
If you need a lightweight read-only tabular display
Use a Repeater.
If you need your solution to be small and fast
Use a Repeater (lightest) or DataList (lighter).
If you want to use a template to customize the appearance of the
display
Choose a Repeater or DataList.
If you want to select rows or edit the contents of a data table
Choose a DataList or a DataGrid.
If you want built-in support to sort your data by column or paginate
its display
Choose a DataGrid.
ASP.NET provides three excellent options for displaying tabular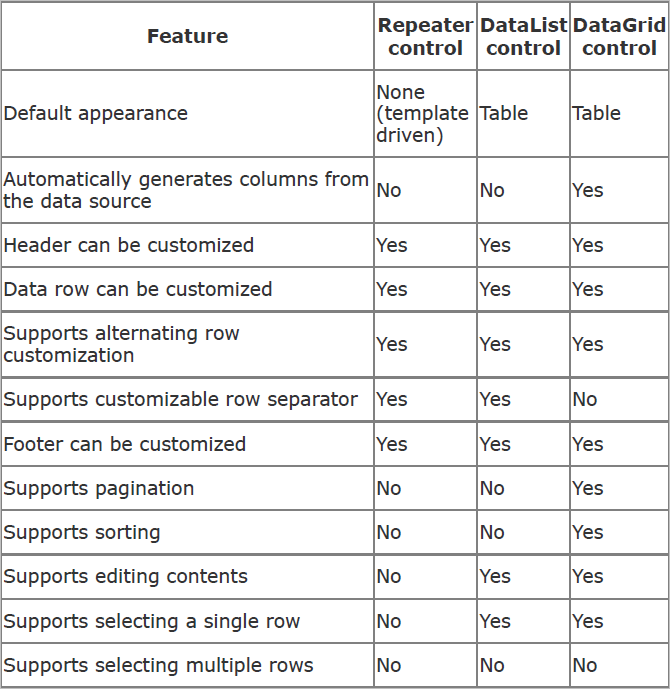
 Performance issues aside, there are some other aspects to consider
See lessdataRepeater, DataList, and DataGridbut each comes with tradeoffs.
For instance, the DataGrid control is particularly versatile, but
you can pay a heavy price in terms of performance. On the flip side,
the Repeater control is lighter weight, but is for read-only display; if you later decide you need to edit your data, you must rework your
code to use the DataList or DataGrid control instead (unless, of
course, you want to embark on your own custom coding odyssey).
The impact on performance is due to the fact that ASP.NET creates an
actual control for every element of a DataGrid control, even
whitespace, which is built as a Literal control. Each of these
controls is then responsible for rendering the appropriate HTML
output. The DataGrid is, therefore, the heavyweight of the grid
control group, because of the server processing required to build the
applicable output. The DataList is lighter and the Repeater lighter
still.
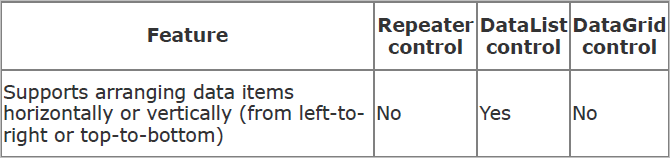
Table 1-1 summarizes the built-in features supported by the tabular
controls and only includes controls that support data binding. (A
standard Table control is not included because it does not inherently
support data binding, even though individual controls placed in a
table can be data bound.) With custom code, there are virtually no
limits to what you can do to modify the behavior of these controls.
Table 1-1. Comparative summary of native tabular
control features
when choosing a tabular control. As a general rule, the DataGrid
works extraordinarily well for a quick-and-dirty tabular display (see
Recipe 1.2) and for other situations in which you think you’ll be
reasonably satisfied with its default appearance and behavior. Indeed,
because the DataGrid is so versatile, this chapter provides many
recipes for modifying and adapting it. However, if you anticipate
needing a lot of flexibility in controlling the organization and layout of
the tabular display or you do not need to edit or paginate the data,
you may want to consider using the DataList or Repeater instead.
For example, Recipe 1.3 shows how you can use templates to
organize and enhance the output of a tabular display. Take a look at
that recipe’s output (Figure 1-2) to see what we’re driving at. Some
up-front planning in this respect can save you considerable time and
effort down the road.